Wet rooms are one of most popular trends in bathroom design. Whilst they can be fitted seamlessly into most bathrooms, their installation can be far more complex than a standard shower. Understanding how to install a wet room on different floor types is key to ensuring their success. This is because your floor type dictates every other aspect of the install.
The two main floor types are classified as timber/wooden or solid/concrete floors. Timber floors are common in new builds and are most commonly used in the construction of upper floors where the joists run parallel and support a sub floor that is usually made of plywood. Solid/concrete floors in older buildings need to be treated in a different way to brand new screeded floors in new builds. These solid floors will need to have appropriate plumbing installed which will connect to the wetroom drainage and may require the removal of a section of concrete.
Solid floors constructed in new builds are often specifically designed to have a wet room installed on it. That means there is no need to remove the existing flooring to install plumbing as the screed is laid to falls to accommodate the drainage. We’re here to guide you through the technical process of installing a floor former or dec onto a timber floor and a wet room drain onto a new screeded floor.
How to Install a Wet Room on a Wooden/Timber Floor
Floor & Wet Room Drain Installation
If you plan to install a wet room onto a wooden/timber floor, the most popular way of doing so is to install a wetroom floor former or dec. The floor former will have a consistent gradient or fall built in to it to channel water to the drain. In order to fit the dec onto the joists, a section of the sub floor equal to the size of the dec needs to be removed and the dec fitted into the gap. The idea is to replace the sub floor section with the dec which is supported with ply lining before being waterproofed.
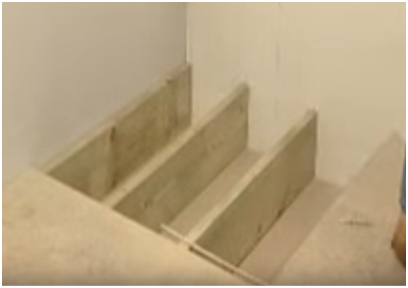
Once the sub floor is removed, 18mm plywood should be fixed onto timber battens to provide a flat base for the floor former.This will ensure the dec is even with the rest of the flooring. Noggins can also be used to support the edge of the floor former.
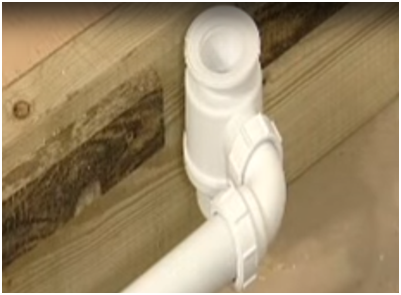
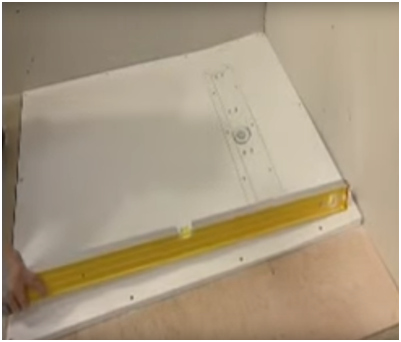
Once the dec is level, you can start the process of installing your drainage. Loosely fit your drainage component and drill out the centre of it using a 50mm hole saw. Using the pilot hole as a reference point, cut out a 90mm diameter hole in the 18mm ply. Remove the ply and loosely fit the trap onto the waste pipe. Loosely re-position the 18mm ply, Floor Former and Base Component to re-check alignment and once adjusted, solvent weld the trap into position. 18mm ply should then be fixed to the support battens and the floor former should then be fixed flush to the ply support.
The rubber seal should be fitted to the trap and the base component screwed into the floor former, prior to loosely fitting the grill to check its positioning. Suitable jointing compound should be applied to the neck and screwed into the trap. The floor should be level and is now ready to install the waterproof floor membrane. (See the ‘Waterproofing Or Tanking A Wet Room’ section below for details)
Explore Our Wetroom Products
CCL Wetrooms' extensive range of wetroom supplies include wetroom systems for timber floors, systems for solid floors and waterproofing membranes.
How to Install a Wet Room on a Concrete Floor
Wet Room Drain Installation
If you are planning on installing a wet room drain onto a concrete floor, the most popular option is to use a screed drain. The first step of the process is to choose the outlet direction you require and carefully turn the drain to face the outlet position required. Adjust the drain to the approximate height required and tighten by hand. If the drain is being situated against the wall, rotate the legs 180 degrees to enable a flush fitting. Once fixed, use a sturdy tape to cover the top of drain opening to prevent debris or concrete getting into the waste pipe during the pour.
The fall towards the drain is created within the top screed which is applied to the shower area. The recommended fall is 12mm over a length of 1 metre. The drain can now be fitted onto the screed base and screwed securely into place. Remove and store the stainless steel frame and grill in a safe place prior to screeding.
Set the height of the drain to the top of the screed, remembering that you will need to create a fall to the drain. Ensure the wet room drain is level before tightening the adjustable legs. The trap should now be connected to your waste pipe, ensuring it has an independent waste (do not connect to drainage that is being used for adjacent baths or basins). The screed can now be poured, making sure you have the appropriate fall of 12mm across the shower area.

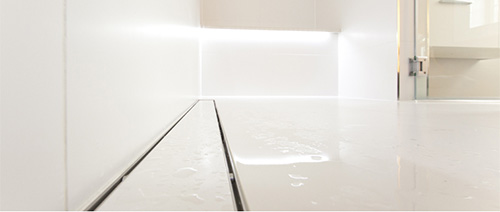
Once the fall has been achieved and the screed has dried sufficiently, you will need to install your waterproofing. Then refit the stainless steel frame and grill to the trough to a height of 1mm below your required tile height.
Waterproofing Or Tanking A Wet Room
Tanking is a vital part of installing a wetroom. It is important to start with a clean surface, so remove any dust, oil or debris as this can affect adhesion of the tanking membrane. Once your area is clean, prime all areas with a waterproof primer. This includes the floor and walls up to the ceiling. Remember to prime a splash zone of at least 1000mm to 1500mm outside of the showering area too. Once the primer has dried, apply your waterproof pre-formed corners, as well as taping around the perimeter of the shower and wall/wall and wall/floor junctions with a waterproof reinforcing tape.
Finally it is time to use a self-adhesive waterproof membrane across the whole shower area and this should be applied to the manufacturer’s specifications. This will provide your main protection against leaks so it is important to be very thorough. A painted on waterproof membrane should be used on the wet room walls, prior to commencing tiling.
Through our sister company Wetrooms UK, we provide a fully guaranteed wet room installation service. Take full advantage of our 30 years of wet room installation experience by following the link.